
 Using a Polarizing Filter
A polarizing filter can dramatically improve your waterfall pictures.
I qualify the statement with "can" instead of "will" only because the effect of a polarizer is dependant on your position (actually, the position of the filter itself) relative to the sun. And on an overcast day the polarizing effect is reduced as well.
A polarizer is the most useful filter you can own and many outdoor photographers don't take any pictures without one. I know I don't. If you had to limit yourself to one accessory besides a tripod, this would be it.
So first you need a quick primer on polarizing filters and how they work. I'll try to keep it simple.
|
Primer on Polarizers
|
Benefits of a Polarizing Filter
The benefits of a polarizer are numerous. Here are a few.
- Reflection Reduction - Reflections from the surface of water and rocks can be eliminated or reduced.
- Improved Skies - Blue skies are deepened and clouds are enhanced. Why? Because light in the sky is partially polarized.
- More Vibrant Colors - In general the color of nearly everything will be more saturated due to small reductions in glare off of leaves and other surfaces.
- Slower Shutter Speed - A polarizer reduces the amount of light getting to your camera by 1 1/2 to 2 stops. This is a benefit for waterfall pictures when you want a longer exposure as explained here.
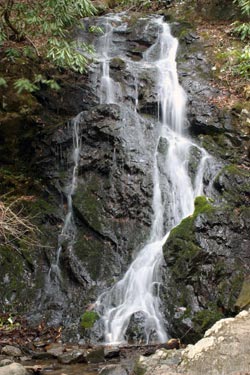
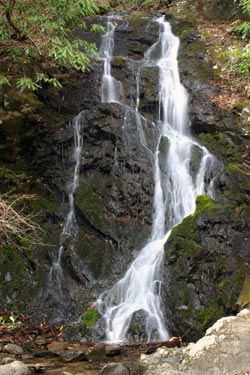
Example
| No polarizer used on this picture of Cataract Falls in Great Smoky Mountain National Park | A polarizing filter was used. Note the reduction in reflected light and the darker, more vibrant greens of of the leaves and moss. |
 |
 |
Using a Polarizer
Theory aside, using a polarizer is easy. Just look through your camera's viewfinder and rotate the filter to see the effect. Piece of cake. Sometimes a reflection is a good thing so you can easily add or subtract reflections to you heart's content.
Here are a few extra tidbits to get the most out of your filter.
First, the polarizing effect is greatest at a 90
° angle from the sun, so if you aren't getting rid of enough reflections, try adjusting your position and angle in relation to the sun. Same with getting more blue in the sky.Also, when reducing reflections the polarizing filter is the most effective when you are about 35° above or to the side of the reflection. It's a science thing.
What about exposure adjustments?
It depends on your camera, but almost all camera models now have through-the-lens (TTL) metering which automatically adjusts for the reduction in light.
Additional resources
This page on polarizing filters has an interactive lens that you can rotate to see how reflections are reduced. Way cool.
Another good resource is great-landscape-photography.com. Their diagram on how a polarizer works is the best I've seen.
Return to top of Polarizing Filters
New! Comments
Have your say about what you just read! Leave me a comment in the box below.