Baskins Falls
Great Smoky Mountain National Park, Tennessee

Baskins Falls (03/30/2006, 38 mm, f/22, 4 sec, ISO 100 hi res photo)
Description
This waterfall is a hidden gem.
I'm not sure why but the literature on waterfalls from Great Smoky Mountain National Park Service does not mention Baskins Falls (also referenced in places as Baskins Creek Falls) anywhere. While perhaps not as nice as Ramsay Cascades, it is certainly better than many popular waterfalls in the park. If you're thinking about a hike to Grotto Falls, consider going to Baskins instead.
Don't be fooled by the average waterfall ratings. This is a very picturesque waterfall with lots of appeal. I simply must keep my higher ratings for the waterfalls with higher flow and/or longer drops for their shear impressiveness. You can judge for yourself from the pictures.
After crossing the creek below the falls, there is plenty of room to rest and have a snack. You can look at our family snapshot to get the picture, pun intended.
Getting There
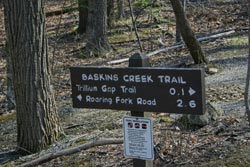
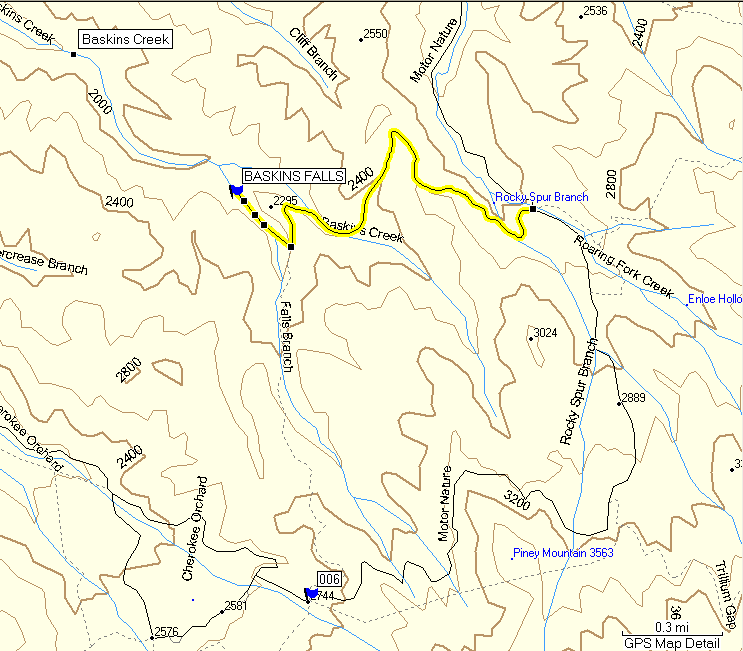
Baskins Falls is located on the Roaring Fork Motor Nature Trail out of Gatlinburg,TN. At light #8 in Gatlinburg, turn south onto Airport Road. After 3.7 miles the road turns into the one-way Roaring Fork Motor Nature Trail. About 0.2 miles farther is the first trailhead for the falls. The only marking is a small brown sign for Baskins Creek Trail. There are a couple of small pullovers, one before and one just after the trailhead.
Your preference may be to drive on around to the second trailhead. The hike distance is the same but the difficulty is different. See below for more.
The second trailhead is located another 2.7 miles past the first. You will see a decent sized parking area on the left side of the road just before the road crosses a bridge. There is an old homestead located on the other side of the bridge. The trail leaves the parking area so you can't miss it. Again it is called Baskins Creek Trail.
Hike Details
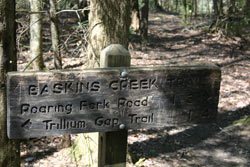
There are two different routes to the falls. Both routes are the same overall distance but Route #1 has more elevation change. Either way, it is 1.3 miles to the side trail to Baskins Falls. The side trail is not well marked but it is easy to spot next to the trail sign seen here. You can see the trail to the falls directly behind the right of the sign.
Route #1
See the topo for Route 1. This is the hardest route due to the elevation gain on the way back out. Here is the actual profile of the hike.
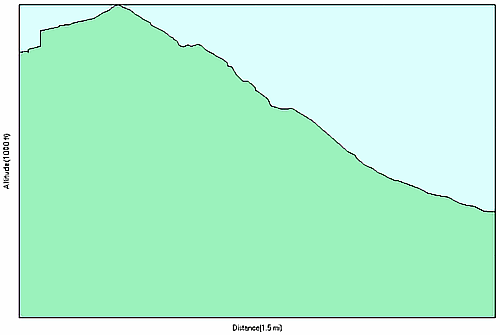
The low point is at the falls. It is a slow, steady climb almost the entire hike out. My daughter did not enjoy the return trip. I estimate the total elevation gain at around 700 feet. I can't compare this hike to Route #2 since I haven't used it other than to look at the distance and elevation gain. There is a nice view early in the hike, near the high point of the hike seen above. Also, there are a couple of creek crossings that could be tricky in high water. We had to search for a way across at one point that didn't require wading or a serious long jump.
Route #2
See the topo for Route 2. The elevation profile for this route can be seen below. I have no other information for this route.
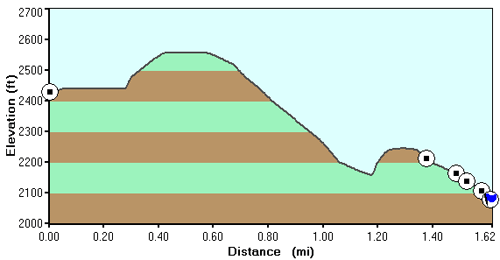
Total elevation gain for this hike to Baskins Falls looks to be about 500 feet.
Photo Tips
The waterfall faces northwest so there will be plenty of shade, at least on the lower two-thirds, for much of the year. Proof of that is the very nice, green moss that is growing on the rocks and logs.
Summertime could cause you some issues, especially for the upper part of the falls. If you look closely at the pictures showing the upper part you will notice that there are bare limbs crossing in front of the water. During leaf season your view will be at least partially obscured by these branches. On the other hand it will also provide more color for your waterfall picture, so take your pick.
I was there between 11:30 am and 12:30 pm and was still able to get some long shutter speeds using the ISO 100 setting, small apertures, and a polarizer. For this waterfall, I recommend exposures in the 1 second range or longer.
A polarizing filter is vital for good pictures here to reduce the glare on the dark rocks and to bring out the vivid greens of the moss. And as always, a tripod is a must.
From a composition standpoint, I pretty much covered all the angles and I've provided a good sampling for your review. Analyze the pictures and decide what you like and don't like. Personally I prefer the close-ups of the bottom with the mossy rocks. The best angle for pictures seemed to be on the opposite side as you reach the falls.
For most of the shots I kept the top of Baskins Falls out of the frame. Direct sunlight was hitting the top. Keep that in mind if you're there in the middle of the day.
You will be close to the falls so a wide angle zoom should take care of most potential compositions.
Waterfall-Picture-Guide › Tennessee Waterfalls › Baskins Falls
Like This Page?
The Essentials
Baskins Falls


New! Comments
Have your say about what you just read! Leave me a comment in the box below.